Repository navigation
en plugin dev tutor
Note
To build a plugin for incoming messages, new group members, and other Bot events, complete the basic setup here and continue with the Event Processor tutorial.
In version 4.0, we introduced a high-security, high-flexibility production-grade plugin system and provided developers with rich APIs and easy-to-use supporting tools.
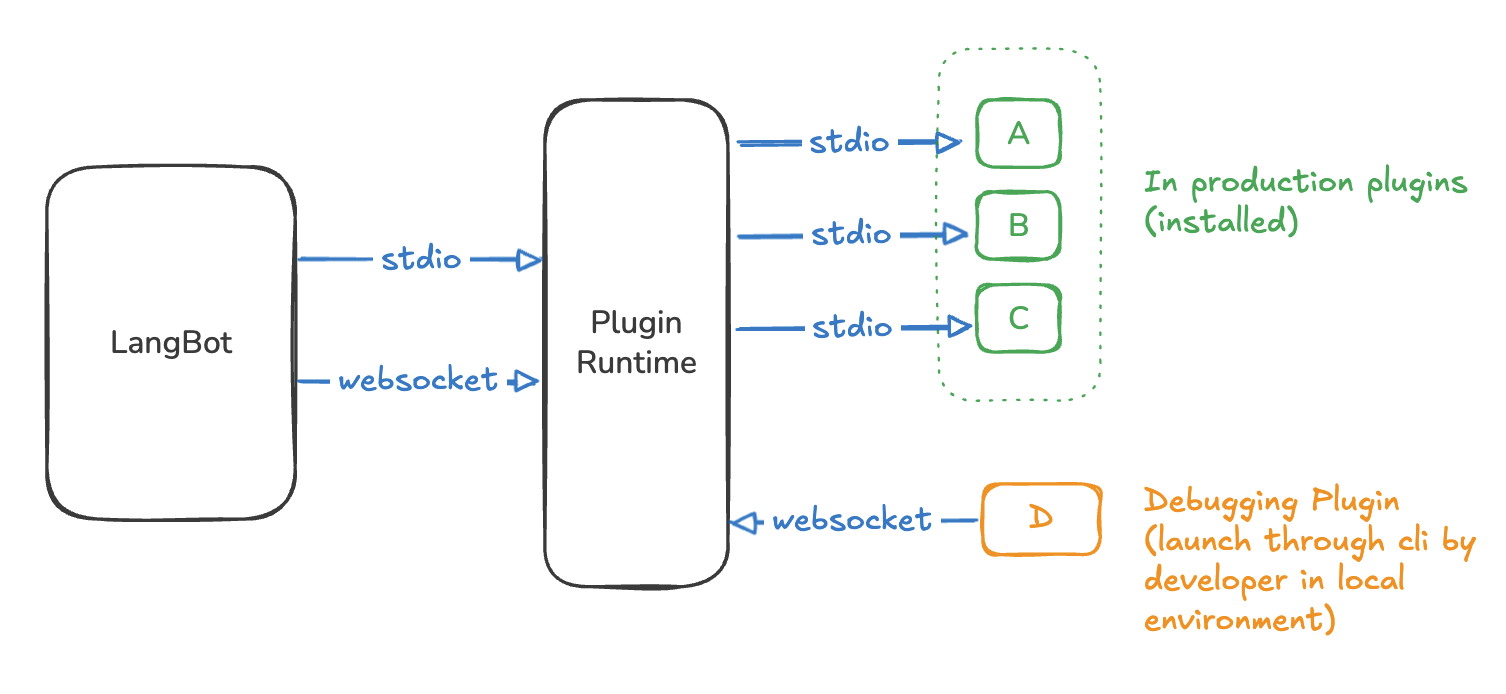
Plugin Runtime is used to manage plugin lifecycles and coordinate interactions between LangBot and plugins. It has two operating modes: stdio and websocket. When LangBot is started directly by users (not running in a container), it uses stdio mode, which is common for personal users or lightweight environments. When LangBot runs in a container, it uses websocket mode, designed specifically for production environments.
Plugin Runtime automatically starts each installed plugin and interacts through stdio. In plugin development scenarios, developers can use the lbp command-line tool to start plugins and connect to the running Runtime via WebSocket for debugging.
A plugin's directory structure is similar to the following:
➜  HelloPlugin > tree
.
├── assets
│   └── icon.svg  # Plugin icon, displayed on the plugin marketplace page
├── components  # Plugin component directory, stores various component code and manifest files
│   ├── __init__.py
│   ├── commands
│   │   ├── __init__.py
│   │   ├── info.py
│   │   └── info.yaml
│   ├── event_listener
│   │   ├── __init__.py
│   │   ├── default.py
│   │   └── default.yaml
│   └── tools
│       ├── __init__.py
│       ├── get_weather_alerts.py
│       └── get_weather_alerts.yaml
├── main.py  # Plugin main program, listens to plugin lifecycle
├── manifest.yaml  # Plugin manifest file, describes plugin metadata
├── README.md  # Plugin documentation file, describes plugin functionality and usage, displayed on the plugin marketplace page
├── readme
│   └── README_zh_Hans.md  # Simplified Chinese documentation, for multi-language docs
├── requirements.txt  # Plugin dependencies file
└── .github
    └── workflows
        └── release.yml  # GitHub Actions workflow, automatically builds and publishes a Release when the version is bumped
The plugin class in main.py is common code for each plugin, initialized when the plugin starts and passed context information (configuration, etc.). You can implement initialization and shutdown logic for the plugin here. The plugin class inherits from langbot_plugin.api.definition.plugin.BasePlugin and provides LangBot Global APIs.
Each component is a core functional module of your plugin, which can be added and removed as needed. Different components are called in different situations, making it easy to extend plugin functionality later. Each component directly inherits from the various component base classes under the langbot_plugin.api.definition.components package and contains a plugin: BasePlugin object, allowing you to directly call the plugin's APIs.
Note
- For detailed API documentation, please refer to API Reference.
Please continue reading this tutorial to understand the plugin development process.
-
skills-LangBotplugin - Skills contributed by community member @TyperBody, use AI to quickly develop plugins, welcome to try
- langbotplugin This skill provides automated plugin generation tools
- langbotplugindebug This skill provides plugin debugging tools
Please ensure you have Python 3.10 or higher installed, and have installed the uv package manager.
Execute the command in any empty directory to install LangBot CLI and SDK:
pip install -U langbot_pluginAssuming your plugin name is HelloPlugin, create a directory HelloPlugin in any directory, enter that directory, and execute the command to initialize the plugin:
lbp initFollow the prompts to enter Author, Description, and other information.
Note
You can also use the lbp init HelloPlugin command to initialize the plugin in the subdirectory HelloPlugin.
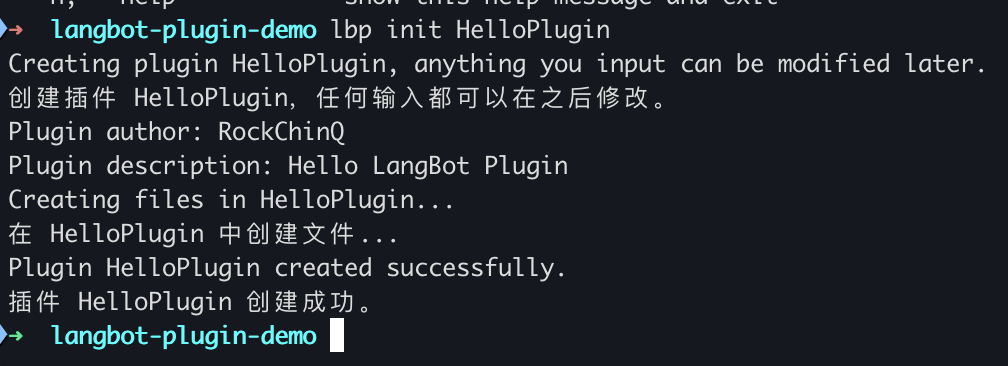
This operation will generate the initial files for the plugin. You can now open the HelloPlugin directory in your favorite editor and start writing plugin code.
Note
If you get a "command not found" error for lbp, it may be because you have not properly set the PATH environment variable.
You can use python -m langbot_plugin.cli.__init__ instead of the lbp command.
For example:
python -m langbot_plugin.cli.__init__ init HelloPlugin
cd HelloPluginYou need to first deploy and start LangBot, ensuring that Plugin Runtime is running and listening on port 5401.
Note
Runtime has two startup modes:
-
Stdiomode: When you start LangBot using source code without the startup parameter--standalone-runtime, LangBot will automatically start Plugin Runtime as a subprocess and communicate with Plugin Runtime throughstdio(standard input/output streams). In this case, Runtime will load plugins from thedata/pluginsdirectory in the LangBot root directory and listen on port5401of the LangBot host as a debug port. -
WebSocketmode:- Production environment: When you start LangBot using the official
docker-compose.yaml, Plugin Runtime will run in a separate container, and LangBot will communicate with Plugin Runtime in WebSocket mode due to the startup parameter--standalone-runtime. The 5401 port of the Runtime container will be mapped to the 5401 port of the host as default. - Development environment: If you start LangBot through source code with the startup parameter
--standalone-runtime, LangBot will connect to the already started Plugin Runtime according to theplugin.runtime_ws_urladdress (port usually 5400) configured indata/config.yaml. You need to start the standalone Plugin Runtime yourself, see Developing Plugin Runtime.
- Production environment: When you start LangBot using the official
Whether in stdio or websocket mode, Plugin Runtime will listen on port 5401 of its host as a debug port for plugin debugging connections.
When developing plugins, we recommend starting LangBot according to the Development Configuration method, which will start Plugin Runtime in Stdio mode, making plugin development easier.
Copy .env.example to .env. In LangBot WebUI, open Extensions → Debug Info and copy the current Workspace's Debug URL and Debug Key into DEBUG_RUNTIME_WS_URL and PLUGIN_DEBUG_KEY. Every Workspace has a different key, and it rotates every two hours; copy it again after expiry.
cp .env.example .envStart plugin debugging, and you will see the plugin output:
lbp run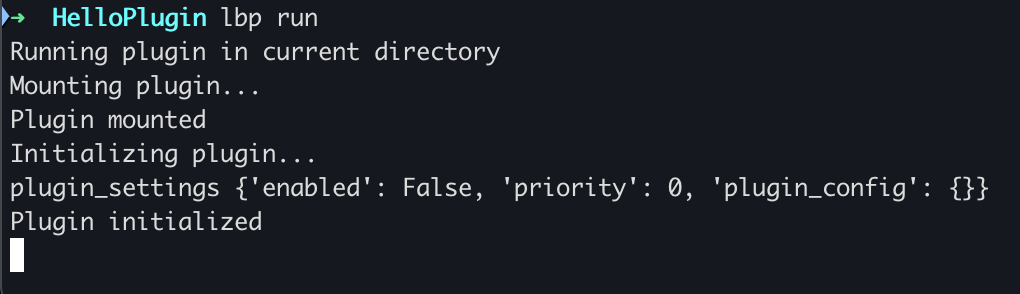
And you can see this plugin has been loaded in LangBot's WebUI.
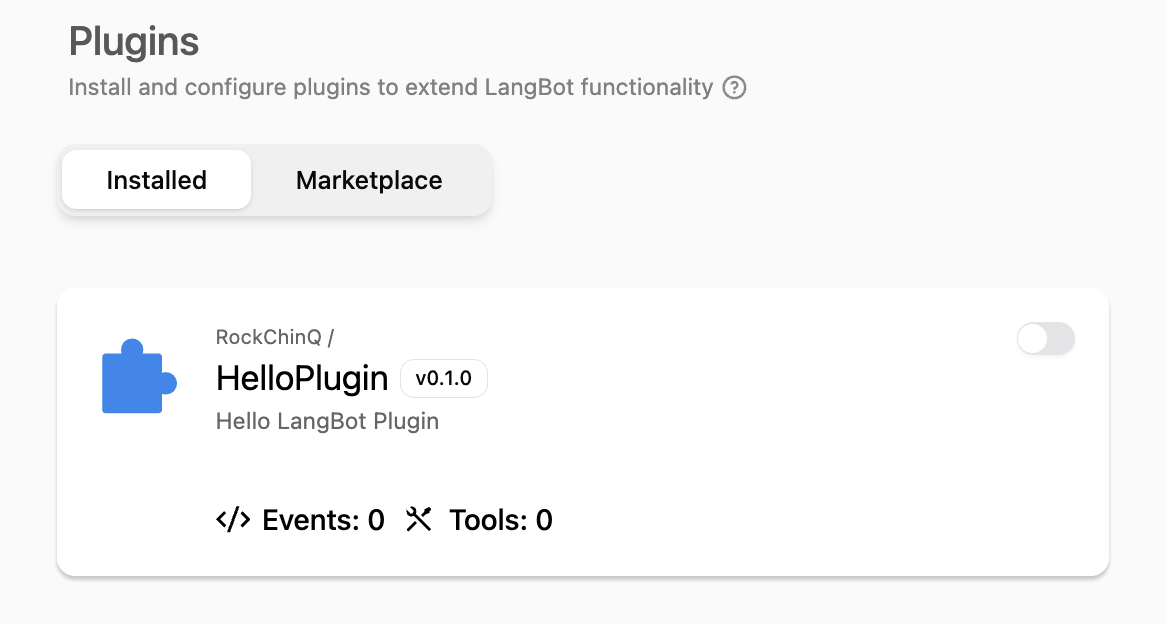
This tutorial will guide you through step-by-step completion of plugin functionality.
- Modify Plugin Information: The plugin has been created with basic plugin information. Please complete the plugin information.
- Add Components: Plugin components are the core functional units of plugins. You can add components based on your needs.